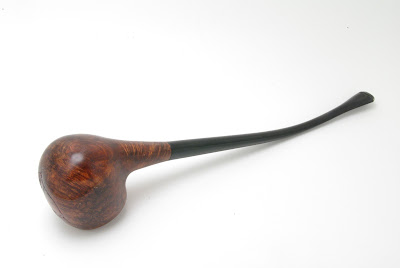
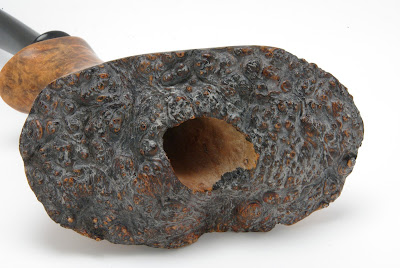
In The Wise Old Man tobacco pipe I went back to playing with squares again. I didn't keep it the straight lines like on The Gavel but it's still blocky. Also, the distress was fun to play with.
Tuesday, October 30, 2012
Monday, October 29, 2012
An Unexpected Arms
This is the arms I put together for the inspiring character Bilbo Baggins from J.R.R. Tolkien's The Hobbit. It was a fun change from working on pipes. The materials used are oak, steel, bronze, leather, dye, and ink. This shield can be worn on the arm and also slung over the shoulder. Enjoy!
Labels:
Bilbo Baggins,
bronze,
coat of arms,
dye,
ink,
J.R.R. Tolkien,
leather,
oak,
shield,
steel,
The Hobbit
Monday, October 8, 2012
The Prow (ed) pipe
The Prow (ed) pipe is another break pipe. The chamber is bored to only 5/8" diameter and only 1 1/4" deep making it perfect for smoking during your lunch break or any other time you don't have much time. The stem has been turned and shaped from a piece of vulcanite rod whereas many of my other pipes have modified cast vulcanite stems. Small, handsome and a goofy ships prow all make this a pipe to be proud of.
Friday, September 28, 2012
An Altar and a Chapel
Not only did St. John Kemble smoke pipes, but he also celebrated Mass. Here is an Altar I designed and made for a small chapel. The design is fairly basic but the arches make it look fantastic. Making the arches was a lot of fun, but I will have to figure out a little bit safer way to route the profile the next time I make something like this. The wood used for the pews and Altar is oak, with a deep red stain. The Altar top is a piece of marble. I also refinished the pews, and modified a pew to be a presiders chair. The Coat of Arms is a Carmelite coat of arms, and the chapel itself is dedicated to Our Lady of Mount Carmel. The finish and color turned out quite well and the whole project looks great.
I'll have more pipes up soon.
Saturday, July 7, 2012
A Cute Little Smoke
I have had several requests over the last several months to make some smaller, more feminine looking pipes and as a result i have created this Cute Little Smoke. This cute tobacco pipe has only a 5/8" diameter chamber and is just over an inch deep, which actually makes for a slightly coolers smoke. The red dye gives it a smart look and the curves are fun. I'ld love the input of any ladies on this to see if I'm on the right track or if I need to change the design some more.
Wednesday, June 27, 2012
Having a ball
So it's been a while. Life seems to move quickly and I can hardly keep up and since I haven't made a pipe in three weeks I thought I'ld roll this baby out. The woods are Wenge in the middle, Cherry on each end all on a poplar dowel. The finish is a tung oil. This ball for contact juggling was quite a lot of fun to turn, even though you can't smoke it.
Wednesday, May 30, 2012
The New Dominion
The two tobacco pipes of The New Dominion were commissioned by a friend of mine (upon whose name dominion is a bit of a play) for himself and his brother. This has been the first set of pipes I have made. The two pipes are similar but with significant differences. I had given them three options to choose between and both brothers asked for the same thing but one wanted a churchwarden stem. I am thrilled with the outcome. The shields with the initials in them came out particularly well.
Labels:
brothers,
Churchwarden,
initials,
New Dominion,
options,
Pipe,
set,
shields,
Tobacco
Tuesday, May 15, 2012
The Trying Triad
I continue to read up on pipes and have noticed two major controversies. The effects of finish on the pipe and the effects of the size of the airway. It is these two hotly debated topics that the Trying Triad tobacco pipes are comparing. All three pipes are within a half inch in length with each other, with similar bowl sizes and exterior thicknesses. All three are Italian Briar with german Vulcanite stems.
This first pipe has the airway that I normally use and a carnauba wax finish which is also my most typical finish.
The next pipe has an enlarged airway but than has a Buffed Oil finish which I have heard causes the pipe to stop breathing.
This last pipe also has the enlarged airway but the finish is a Spray Lacquer.
So this is by no means a scientific test but I am smoking the same tobacco out of these there pipes to see if I can detect a difference in the way they perform. I will keep you up to date on the results.
Tuesday, May 8, 2012
The Wizard's Horn
The Wizard's Horn tobacco pipe is a very different pipe. I am not entirely sure how well I like it. Visually it is beautiful. The straight grain of the plateaux briar is stunning and I have been improving on the way I use the dyes which have given this pipe an amazing finish and the rough outside of the root burl is always fascinating. What I am not happy about is the curve, and how that has effected the way it sits in the mouth. This is not a lazy pipe, all the weight is out at the end and the stem doesn't displace any of the weight from out to down. Still it is smokable and looks amazing, you just might want to build up your biceps before smoking this one.
I want to give a return shout out to Catholic Stuff Podcast created by the willing minds of Fr. John, Fr. Peter, Fr. Mike, Joe Doman, and, last but certainly not least, the esteemed Nathan Goebel. Joe recently lead a podcast on our own St. John Kemble and encouraged the listeners to check out this site, so thank you gents over at Catholic Stuff. Listen to this podcast, they have some amazing topics and deal with them thoughtfully and enjoyably.
Monday, April 2, 2012
The Lucky WIzard
It's been a while now since I've created a wizard pipe. I decided to combine the idea of my lucky pipe with the my freehand wizard design and thus was created the Lucky wizard. this pipe has substantially thicker walls on the bowl than the lucky pipe which became a concern of mine the more I looked at it. I do like freehand pipes but they quickly become very similar and as I am trying to stay on the more unique side of pipe designs I don't want to wear out a good thing to quickly. I did want to try the green Dye again and it looks great on the italian brair. This is most certainly my last St. Patrick's day inspired pipe of the year. I am hoping to turn my eyes back toward the Lord of the Rings Travel pipes soon, strong, sturdy pipes with wooden stems.
Tuesday, March 20, 2012
The Irish Potato
I like the potato pipes and this one sports a lucite stem. They are basic pipes but the eyes give each one it's own flavor. I know that Irish potatoes are one of the most over used stereotypes and this stereotype is only made more fascinating by the fact that potatoes, like tobacco, are a new world plant. So no one really knows what the Irish ate before Columbus discovered America. Enjoy.
Wednesday, March 14, 2012
The Lucky Pipe
I've made a couple pipes in honor of the upcoming St. Patrick's day. This tobacco pipe is the first that I am posting. The most striking feature is obviously the bowl shape. After having experimented with square bowls I feel pretty confident in using other shapes. So this is my first attempt at a four leaf clover. It might also remind one of a bubble pipe design which we all had as children.
This Pipe also has a green hue which is the result of using both a blue dye and a light walnut dye. I removed more dye than I usually do, allowing the grain to really shine through and there is some beautiful grain to show off.
Thursday, February 9, 2012
A Well Balanced Hammer (plus a free game)
There is a great game I have been taught called "Stump". To play you will need a stump (preferably hardwood), a hammer, and a nail for each person who is playing (16 or 20 penny in length). Each person starts his nail into the stump. You want most of nail still exposed but started deep enough that it won't just pop out if it's hit weird (that's one way of losing the game). The goal is to knock everyone else's nails into the stump before your own nail gets knocked into the stump, the last nail standing wins. The hammer makes it's way around the circle of people playing and each person tosses for strikes. This is where it is both fun and dangerous, use your intelligence and give the person throwing plenty of space. The person throws the hammer and must catch it again on the handle. The rotation of the handle is a multiplier, one rotation x1, two rotations x2, three rotations x3, four, well I've never seen that happen so do what you want with it. The base number depends on the throw, straight up in front of you is 1, thrown from under the leg is 2, thrown behind the back is 3. So if I throw the hammer from under my leg (2) and it has 3 full rotations (x3) I get 6 strikes I can use to pound in other peoples nails. If you don't catch the hammer at all or if you don't catch it on the handle you don't get any strikes. When your nail is completely pounded in beneath the surface of the stump you are out. Enjoy this great little game and my newest pipe, The Well Balanced Hammer.
The Well Balanced Hammer is an amazing sitter. The pipe balances on what would be the claws of the hammer and has such a light and beautiful look. DeProfundis suggest making my pipes look lighter by having them curve under towards the bottom and I think this one fits the ticket.
Subscribe to:
Comments (Atom)


